Dxf2Map
USER MANUAL (version 0.22)
Copyright © 2021 AnCode
TABLE OF CONTENTS
1 INTRODUCTION. PROGRAM DESCRIPTION
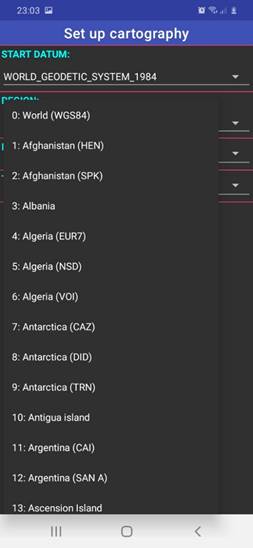
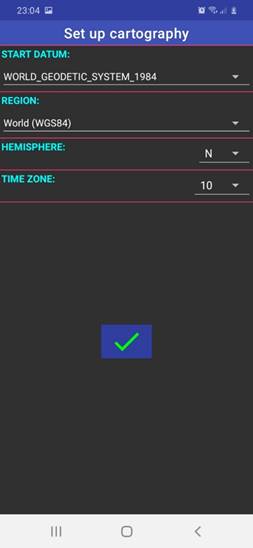
3.5 IMPORT MAPPING AND CHANGE DATUM WINDOWS
1 INTRODUCTION. PROGRAM DESCRIPTION
Dxf2Map is an application for mobile devices (phones and tablets) running Android operating system (OS) that allows you to import geolocated graphic data files in DXF format and draw the imported graphics on top of Google Maps. In this way, the information on the maps can be customized by adding new data of interest to the user.
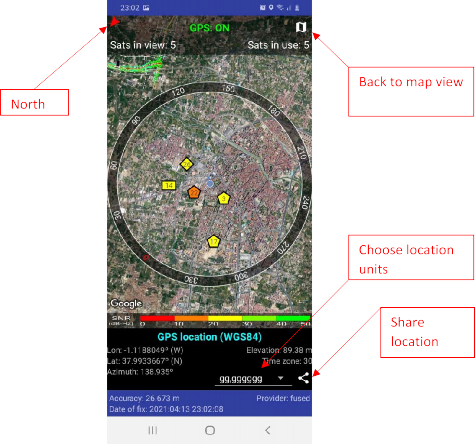
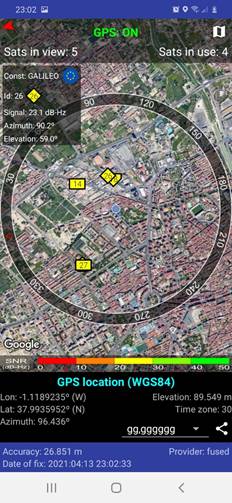
Additionally, Dxf2Map allows you to see and share in real time the location of the device on the personalized maps, in addition to the orientation (compass), and includes a diagram of the sky through which you can check the status of the device's GPS receiver, including the location of the satellites in view and in use, the constellation to which they belong and the signal strength received from each of the satellites.
On this basis, with Dxf2Map geolocated photographic reports can be made using the device's camera, and you can generate PDF and DXF documents for each report, including a location map of the photographs of each report, and descriptive sheets for each photograph. The generated reports in DXF format are geolocated in UTM coordinates.
The application allows to upload photos from the device's image gallery within a report and, later, assign the geolocation and orientation data to the photos by simply capturing the location on the map through a target.
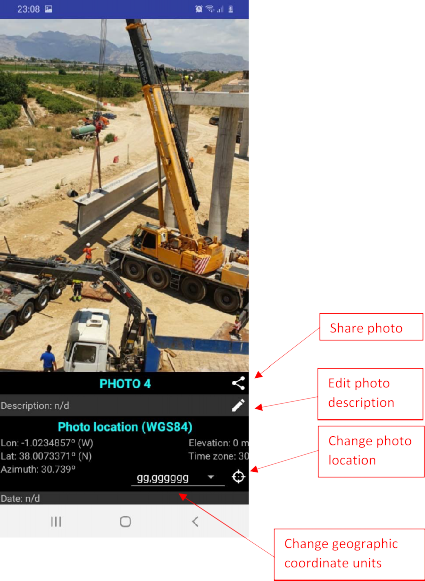
The geolocation data, orientation and description of the photos of each report are permanently stored in the photos themselves through the EXIF standard, (Exchangeable image file format, is a specification for formats image files that allows you to store metadata in them).
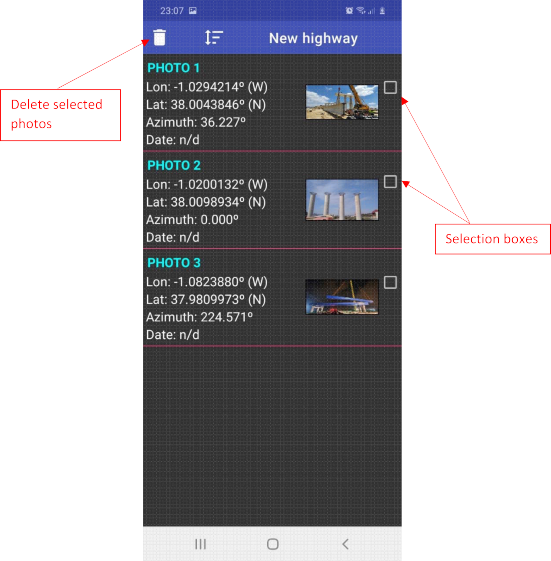
You can view the photographs of each report in its location on the map, or in a list of the photos of the report, or in a full screen photo gallery.
The photographs of each report can be ordered according to the location where they were taken, or according to their age. The reports will be generated with the photos in the selected order.
The displayed location units can be selected from decimal degrees, sexagesimal degrees, and UTM coordinates. The reports generated will show the selected unit.
The reports generated can be shared (messaging, mail, cloud storage) from the same application, as well as the geolocated photos and the location of the device.
The application requires the following permissions to function properly:
- Device location.
- Device camera.
- Read / write to the external storage of the device.
The minimum version of the OS supported by the application is 4.1 (Jelly Bean).
WARNING: If you uninstall the application, all the projects, photos and reports generated with the application will be deleted, being a non-reversible action.
2 PROGRAM OPERATION
To use the program, you must create a project, or open an existing one.
Each project is identified by its name (entered by the user) and its creation date (automatically generated).
The information that can be added to a project is as follows:
- Cartography imported from DXF files.
- Pictures obtained with the device camera, or selected from the device gallery, and their geolocation data, orientation, description and date of creation.
For each project, the following reports can be generated automatically.
- Photo report in PDF. It includes a DIN A3 size drawing with the location of the photos in the report drawn over the base map, and a descriptive tab of each photograph in DIN A4 size.
- Photo report on DXF. A DXF geolocated file with the position of the photos drawn over a snapshot of the base map area in which the photos are framed.
- Map capture in DXF. A DXF geolocated file that includes a snapshot of the base map area displayed on the device screen.
Two files are generated for reports in DXF; a DXF file, and an image file in .png format with the base map image.
The generated DXF file includes a geolocated external reference to the generated image file, so when you open the DXF file, the map image will be displayed in its UTM coordinates and scaled to the actual size of the territory represented in the image. Both files (image and DXF file) are presented compressed in a single .zip file, for easy handling and sending.
Both photos and reports exported in DXF and PDF are stored in the following device’s folders:
· If your Android OS version is 5.0 (LOLLIPOP) and over,
Internal storage/Android/media/com.ancode.dxf2map
· If your Android OS version is older than 5.0 (LOLLIPOP),
Internal storage/Android/data/com.ancode.dxf2map/files
Finally, from the app you can share the following information via messaging, mail or cloud storage:
- Device’s location.
- Generated PDF and DXF reports.
- Photographs of the reports. It is recommended not to send them by chat applications, as in this case it is common for the image to lose the associated EXIF information (location, orientation and description of the photo).
3 USER INTERFACE USAGE GUIDE
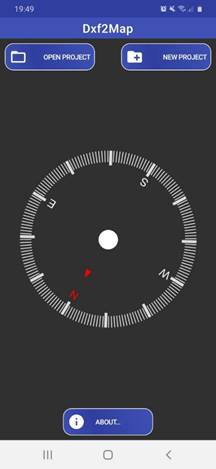
3.1 START WINDOW
This is the first one displayed when you start the application. Displays four items.
- A compass pointing to magnetic north.
- A button to create a new project.
- A button to open an existing project.
- A “about…” button to access information about the application (author, version, manual, third parties, share app, EULA, etc.).
|
|
|
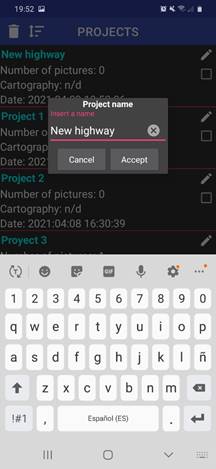
New project
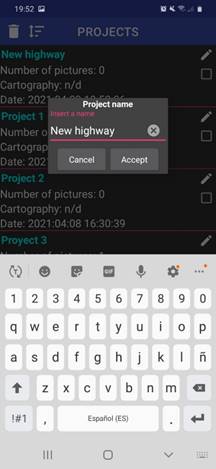
This button opens a pop up window to enter the name of the project you want to create.
The application does not allow you to create projects with empty name, nor two projects with the same name.
Once you have entered a valid name and after pressing the accept button, the new project is created and the map window opens. This window is described in the section map window.
Open project
Pressing this button displays the project management window.
3.2 PROJECT MANAGEMENT WINDOW
This window allows the creation of new projects, and the selection, deletion and reorganization of user-created projects.
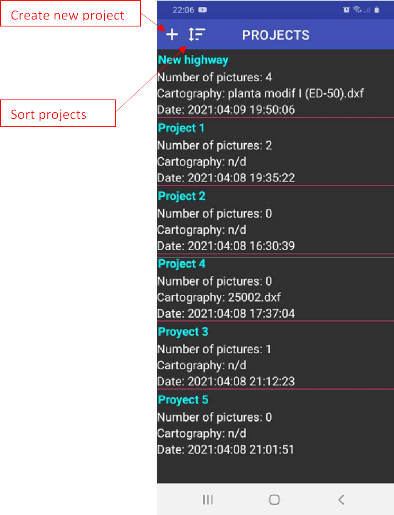
As you can see in the image, the window includes the following items.
- A list of projects created. If no project is already created, the list is blank. Each project displays its name, the number of photos it contains, the name of the associated mapping, and its creation date.
- A button to create a new project. Pressing this button displays a menu to enter the name of the project you want to create. As already noted, the application does not allow two projects with the same name, nor projects with the empty name. Once you have entered a valid name and after pressing the accept button, the new project is created and the map window opens, which is described below.
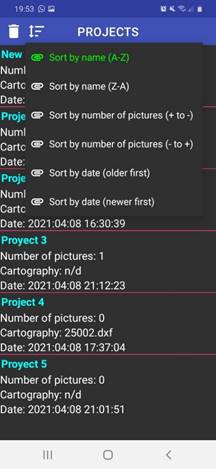
- A control to sort existing projects. They can be sorted by name, by number of photos, or by creation date.
|
|
|
If any project in the project list is long clicked, the window goes to edit mode, a delete button appears and, next to each project in the list, a selection box and a button to modify the project name.
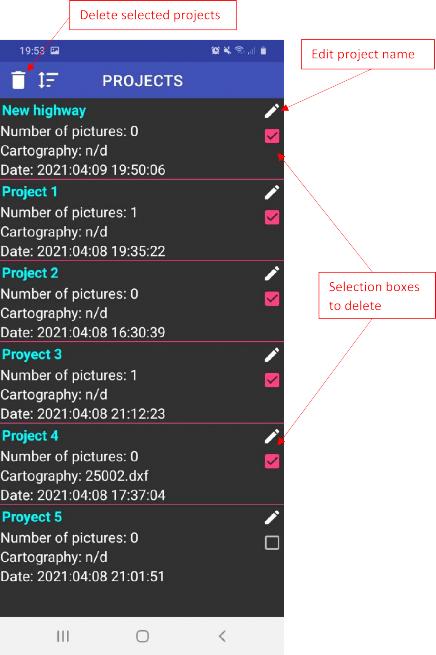
Pressing the delete button deletes previously selected projects using the corresponding selection box, and the window returns to its normal state. If no project has been selected, the window simply returns to its normal state.
This option does not remove from the device's memory the files of the photos that were in the deleted projects.
By normally clicking on any project in the list, the map window opens with the selected project loaded.
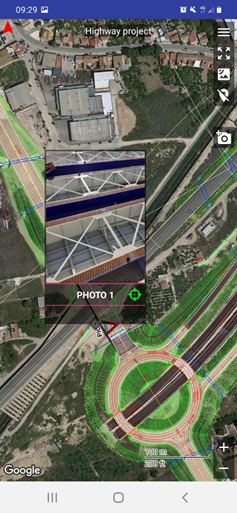
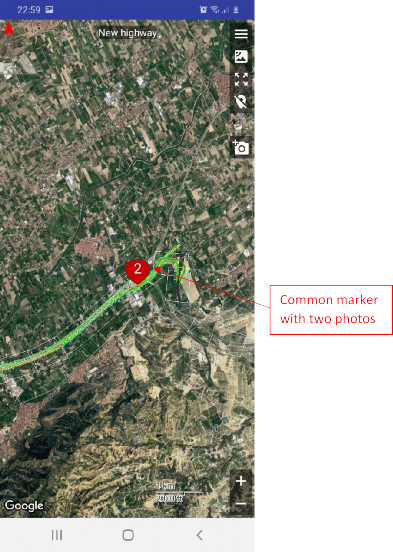
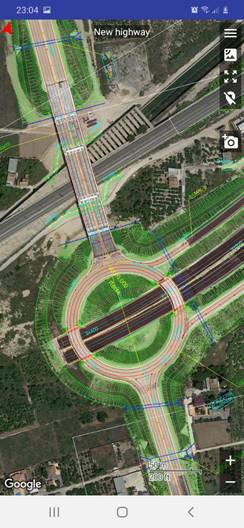
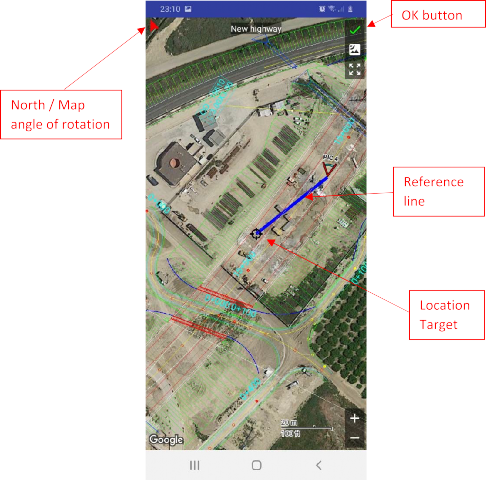
3.3 MAP WINDOW
It is the main window of the application, where the main menu is located and the project data is displayed: the base map, the overlapping DXF mapping, and the project photos geolocated on the base map.
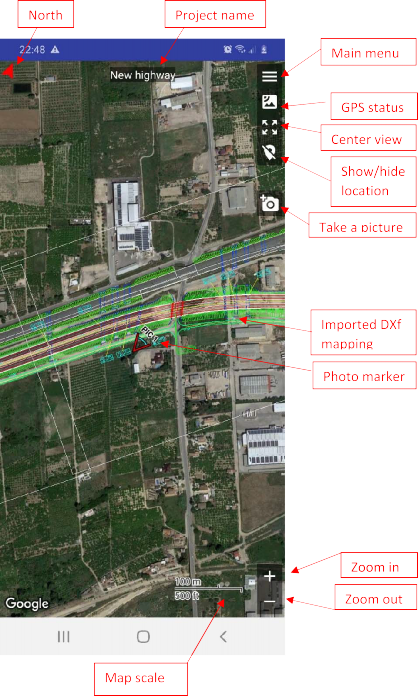
The window includes the following controls.
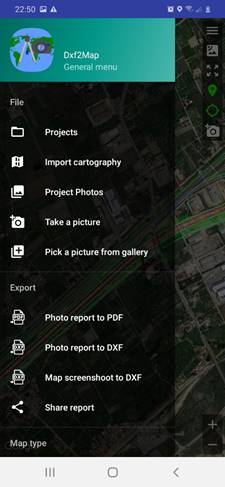
Main menu
This control opens the main menu of the application in the form of a side menu that can also be opened by swiping from the left side of the screen to the right.
|
|
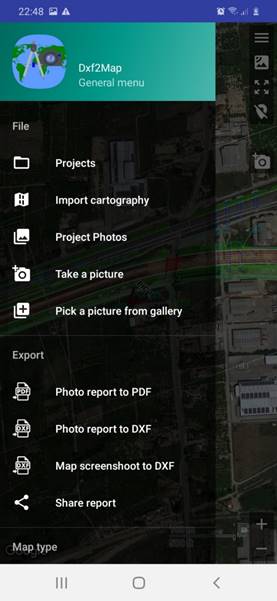
The main menu consists of the following sections.
File.
- Projects. Opens the project management window.
- Import mapping. To upload a new mapping to the project in use. Clicking it opens the default file manager of the device to let you choose a dxf file. You can choose even files stored in your Google Drive account.
- Project photos: To go to the project photo window, which is described in detail later
- Take a photo: Open your device's camera. The photo obtained will be automatically included in the project in use.
- Add a photo from the gallery: To add an existing photo from your device's memory or you Google Drive account to your project.
The application stores photos of all projects in the following folders:
· If your Android OS version is 5.0 (LOLLIPOP) and over,
Internal storage/Android/media/com.ancode.dxf2map/Images
· If your Android OS version is older than 5.0 (LOLLIPOP),
Internal storage/Android/data/com.ancode.dxf2map/files/Images
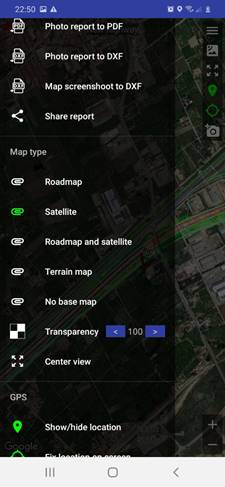
Export.
To choose the report you want to export or share. Reports will be generated using the base map configuration and coordinate units that the application has at the time of reporting.
- Photo report in PDF format.
- Photo report in DXF format.
- Map snapshoot in DXF format.
- Share report.
The application stores the generated reports in the next folders:
· If your Android OS version is 5.0 (LOLLIPOP) and over,
Internal storage/Android/media/com.ancode.dxf2map/Exports
· If your Android OS version is older than 5.0 (LOLLIPOP),
Internal storage/Android/data/com.ancode.dxf2map/files/Exports
Base map.
To change the type and customize the background map display to be displayed on the screen. The selected map type will be the one that will be exported in the different automatically generated reports.
The following types of maps can be displayed.
- Roadmap.
- Satellite.
- Roadmap and satellite.
- Terrain map.
- No base map. Only imported mapping, on a black background.
- Transparency (between 100 and 0). Highlights the imported mapping over the base map. If the value is 100, the imported mapping with the transparent background on the base map is displayed, so the imported mapping will not highlight. If the value is less than 100, the base map display will be dimmed to 0, in which case the completely opaque black background will be displayed, so only the imported mapping can be seen.
- Center view:
o If the project has a loaded mapping, the map is framed to show all the on-screen mapping, and the north is centered at the top of the screen, regardless of the geolocated photos the project may have.
o If your project doesn't have an uploaded mapping, but you have photos with associated location data, the map is framed to show all geolocated photos in the project on the screen.
o If the project has no mapping, no photos with associated location data, nothing happens.
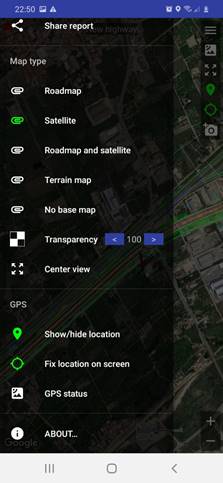
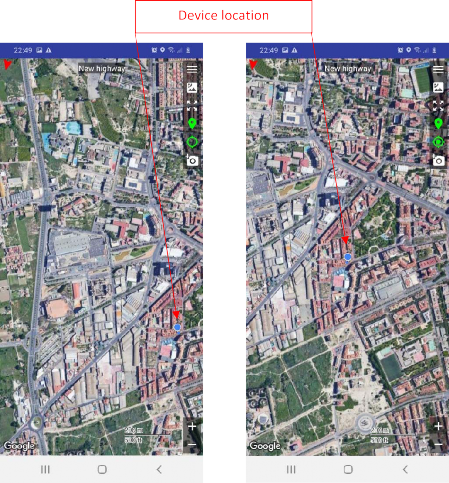
GPS.
- Show/hide location. This button can be in two states:
o Hide location. The location will not be displayed. In this case the icon will be white and is crossed out.
o Show location. The user's location appears on the map, as long as the location is enabled on the device. In this case the icon will be green, and a new control will appear on the screen, which allows you to choose between setting the user's location in the center of the screen or not doing so.
- Set on-screen location. By activating this control, the app will always keep the device position in the center of the screen, and the map rotation will be activated based on the device's orientation to the North (compass mode).
- GPS status. This control opens a window that includes data of interest from the device's GPS receiver, mainly the GPS location, and the satellite data in sight. It is described in section GPS window of this manual.
About.
The application help window opens, where you can view app data, third parties, share and rate the app. End User Agreement License (EULA) is also included.